Hey guys, JM again! I have a new project, I'm building the Hovercraft MHQ. This project is super cool for several reasons, first this is my first drone, second it is my first RC project period and third the entire chasis is 3d printed from ABS plastic on our Makerbot Replicator. I will be doing a video series following the different steps in the build and will be filming the portion regarding the 3d printing this coming weekend. For now heres a link to the Photo Album!
What is a quadcopter? A quadcopter is an aircraft that uses rotor wings (like a helicopter) to generate lift and thrust. A helicopter has one main rotor that produces both lift and thrust for the entire airframe while the second, smaller, rotor in the rear counteracts the torque generated by the main rotor and also allows for yaw or rudder right and left to steer flight. A quadcopter utilizes multiple rotors, four specifically, to do the same thing. The benefits of having four main rotors developing lift and thrust as opposed to one main rotor is stability! Torque is counteracted by spinning the rotors in opposite directions. Two spin clockwise and 2 spin counterclockwise.
The drone pilot operates a radio transmitter with two sticks that correspond to yaw, pitch, roll and throttle. The radiosignal is transmitted to a receiver onboard the drone, the receiver passes the information to the flight controller or (FCS) the FCS has several extremely important functions. The flight controller has an array of sensors, including gyroscopes and a barometer in the case of the Tau Labs Sparky FCS that is being used for this project. Assuming the radio is set to some amount of throttle but otherwise the sticks are in a neutral position the FCS will adjust, in real time, the RPM of each individual motor so that the drone hovers as if it were sitting on top of a tripod. The FCS accomplishes this by sending signals to four Electronic Speed Controllers or ESCs that are each individually attached to a motor. The ESC acts as a flood gate holding back the considerable amount of current in the battery pack. As the ESC receives signals from the FCS it either gives or limits current to the attached motor increasing or decreasing RPM and thus lift. When a stick is moved out of its neutral position to make an adjustment in either pitch, yaw or roll or some combination of the 3 the FCS does some math and creates a difference between the RPM of the four motors. If the pilot wants more roll the difference is across the long axis of the aircraft, if the pilot wants pitch then the difference is along the short axis etc etc. To generate thrust to move forward the aircraft pitches forward, so that instead of lift being directed perpendicular to the ground it is directed at an angle.
Costs for small quadcopter drones can vary greatly. The Hovership MHQ as I have it set up will have quite a few neat features including return to home RTH capabilities and waypoint to waypoint GPS navigation, also altitude hold and loiter mode. Additionally the drone will be fitted with FPV or first person video equipment so that it can be flown over long distances by camera. A downside to this build is that battery capacity being what it is flight time will range from 8-20 mins on one battery. Cost for this build to get it off the ground will be approx $300, with the addition of the FPV equipment it will likely be closer to $500-$700. Most of the equipment is modular and interchangeable so that it can be repurposed for other projects later.
Thursday, July 31, 2014

Thursday, June 26, 2014
DIY Audio
Hi my name's JM, I'm a recent member of HackRVA. Since joining I've been working on some guitar effects pedal clones from tonepad.com. You can see my build picture updates on our Flickr, here's the direct link to the album: http://bit.ly/ULbeu0
I've started with a ProCo Rat clone, its a simple op-amp based distortion pedal with three settings for volume, distortion and filter. I selected this pedal mainly because there was an instructable (http://bit.ly/1lqVJ4K) that had some comments on off-board setups with wiring shown. In the pipe I have a couple other distortion pedals I'd like to try my hand at, at Tonepad there are schematics for the Ampeg Scrambler and the Marshall GUVNOR. Down the road I'd really like to build a flanger, however, the designs for phasers and flangers that I've found all involve multiple IC's with complex boards.
So why make all of the pedals to begin with? Well my brother is a great guitarist. I'm nearly 30 and decided to revisit some life goals. One of the things I've always wanted to do but never stuck with was start a band. The kit I'm building at HackRVA will hopefully turn into the gear that we gig with. Looking ahead a little we have plans to start writing songs and practicing in about six months or so. Between now and then I'm doing daily metronome practice to hone in my metal picking skills (alternate picking, chugging, etc). I'll keep updating the flickr album and the project blog here with project milestones. The component orders to populate the boards are in the mail. Everything that I need to have a functioning pedal should be here in about a week. Assembly will take place sometime next week on the Rat. There are still some components I need to pick up / salvage, for instance a stomp-switch, however I think I can just jump the switch to make sure the circuit works as it should. Keep an eye out in about two weeks or so for a video (hopefully) showing a working distortion pedal. Once the team at the shop finishes the Buildlog.net laser cutter project also look for some cool under-lit case designs, either in acrylic or baltic birch ply.
I wanted to start small because I don't have much of a background in electronics. I'm a nurse, although while I was in school I spent some time as an engineering student and took a couple basic circuits courses. I remember at the time wanting to get into some DIY audio, tube amplifiers and the like but I quickly realized I couldn't make that interest a reality. Mainly because of a lack of money and expertise. I feel like these two environmental factors are a large reason why many people choose to sit on the couch and watch Netflix instead of getting out there and making something. Luckily thats where HackRVA came in to the equation. At Hack I had immediate access to all of the tools needed to etch the boards, as well as fabricate the box (coming in the next several weeks). Eventually I'll even be able to add some cool embellishments (laser cutting on the case-work for instance). Materials costs are low, and all of the specialized tools are right here. At Hack you also have access to expertise. It was difficult sourcing the components to populate the boards. Mouser and DigiKey can be overwhelming places. Its nice to have access to a Makerspace where you can pull someone aside and have them help you dial in your parts list. The more you talk to people and read into the blogs and build logs the more you find interesting new avenues to explore, for instance I just ran accross Dustin's APC build tonight, and am looking forward to making one in the future.
Monday, March 10, 2014
Table Saw Sled - Cut like a pro
by Aaron
We built a table saw sled. This makes for easy and square cutting. Also cut multiples in a stack or make jigs for complicated cuts.
See the new dust collection system in action too.
First Welding Project - Welding Cart
by Aaron
We got right into a first project with the recently donated Lincoln Wire Feed Welder. We took an existing stand, reconfigured some TV mounting rack with cut-off disks, and then welded it all together.
The welding cart will serve as a sturdy home for the welder and all it's peripherals.
More pics here.

Forget Boring Baby Names - Arduino Based Baby Name Generator
by Aaron

Michael produced this humorous baby name generator for friends expecting. He started with an Arduino to prototype then used tools at HackRVA to build a custom board. Snazzy!
Check out complete build details and story on his blog here.
Michael produced this humorous baby name generator for friends expecting. He started with an Arduino to prototype then used tools at HackRVA to build a custom board. Snazzy!
Check out complete build details and story on his blog here.
Friday, March 7, 2014
Atari Punk Makes Hacker's Day
by Aaron
Atari Punk Console from Dustin Firebaugh on Vimeo.
Completed at a HackRVA Thursday Night Open house.
How to make your own:
makezine.com/2011/09/13/collins-lab-atari-punk-console/
and here:
ataripunkconsole.com
Atari Punk Console from Dustin Firebaugh on Vimeo.
Completed at a HackRVA Thursday Night Open house.
How to make your own:
makezine.com/2011/09/13/collins-lab-atari-punk-console/
and here:
ataripunkconsole.com
Monday, March 3, 2014
Atmel XSense Design Challenge
by Aaron


Friday, February 21, 2014
Young Hacker - Cool LED Experiment
by Aaron

Who was that young hacker? Some awesome kid built this at our recent Maker Monday right beneath our noses. Ok, we knew it was Spencer, HackRVA member Stephen's son. But it was kind of funny, you never know what someone's going to be doing around the space. One minute you're cutting some wood and the next you look up, and this!
build details after the break-
Thursday, February 20, 2014
From the Depths of the Web - Noise!!!
by Aaron
Jason Lescalleet - 2012 Aug. 20 - Live at Hack.RVA - Richmond, Virginia from Silver Persinger on Vimeo.
I was digging around on the web for old HackRVA stuff and found NOISE!!! Who knows what all creations have been made here. Our members are kind of amazing.
Jason Lescalleet - 2012 Aug. 20 - Live at Hack.RVA - Richmond, Virginia from Silver Persinger on Vimeo.
I was digging around on the web for old HackRVA stuff and found NOISE!!! Who knows what all creations have been made here. Our members are kind of amazing.
Monday, December 23, 2013
BeagleBrick - The SDR Ham Radio Station
by Aaron
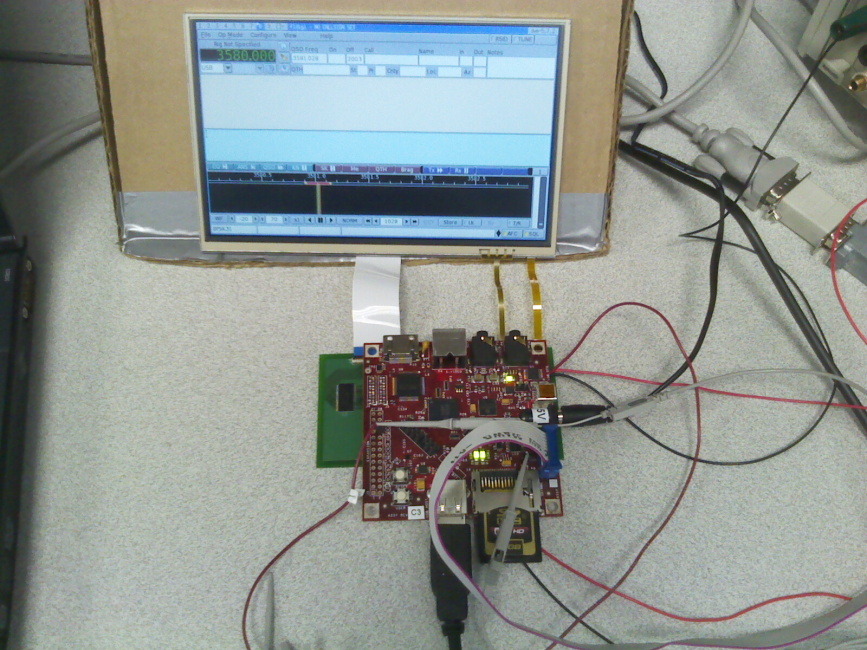
The BeagleBrick was conceived by HackRVA member Robert Thomas, KC4NYK. Robert is an Industrial Designer and Ham Radio enthusiast. He designed the BeagleBrick to be an inexpensive entry point for ham radio enthusiasts, students, educators and other experimenters to study Software Defined Radio technology.
In its current form the BeagleBrick represents a completely self-contained SDR Ham Radio Station using the Beagleboard as a fully functional embedded Linux workstation featuring High Definition Video and sophisticated, chip-level accelerated graphics. It is designed to operate with an array of inexpensive QRP transceiver kits.
Click here to learn more about the BeagleBrick!
Friday, November 15, 2013
Power Wheels Driven With XBOX Controller
by Aaron
RC Jeep from Dustin Firebaugh on Vimeo.
RC Jeep from Dustin Firebaugh on Vimeo.
Neal built this Power Wheels Jeep with the help of friends at HackRVA. Checkout the video above and get the full build details at his Instructables link here.
Monday, October 28, 2013
Aluminium Casting With Li'l Birtha
We spent last Saturday melting aluminum with Paul's "Li'l Bertha" Electric Furnace then sand casting the molten metal into various shapes. We cut down heat sinks and other scrap then threw them in the crucible. The cast in this video didn't go as planned, but others worked well.
⇓See more pics of sand casting.
Tuesday, October 22, 2013
Building a Personal Cloud
by Aaron
 |
| Hardware for a Personal Cloud |
Jamie Duncan is a key member of HackRVA and his blog is LOST IN OPEN SOURCE. There, he covers such things as building a personal cloud as well as general musings on technology. Plenty of details to get people started.
The name Jamie Duncan and HackRVA just go together. Jamie was our "head cheerleader" for over a year, doing everything from organizing the badge build for the Richmond Security Conference to making sure the bills got paid. He's also very involved with RVaLUG. Thanks Jamie, and we'll be seeing what's next on your blog and other places.
From FIRST Robotics to DIY Segway
By Aaron
Checkout this DIY Segway built by Brandon Davies and Dustin Thomson I first saw featured at the Chesterfield County Main Library Makerspace Grand Opening.
Brandon is the son of HackRVA member Bruce "Doc" Davies who's very involved with area FIRST Robotics. This elegant and wonderfully built Segway is an excellent example of FIRST Robotics graduates going on to build more advanced things. They based it on this design from an MIT resource.
⇓Learn more about how they did it after the break.
HackRVA at Hampton Roads Maker Faire

HackRVA presented at the 2013 Hampton Roads Maker Faire. Didn't have time to take many pics, but will upload some as they become available from the HR Maker Faire Facebook.
Here's a link to some good pictures.
Here's a link to a video of the event.
Neal says:
There were some pretty amazing things there but I didn't get a chance to see it all. I spent most of the day driving kids around in the Power Wheels and answering questions about it.
There were shopbots, and laser cutters, stained glass, robots shooting basketballs, a lifesized theremin shaped like a tree, original comic books, an electric Ford Roadster, composting bins designed to be indoors (no smell, that was awesome), an Oculus on a flight simulator, 9 foot tall rockets, an entire house {with furnishings) made of plywood, and a Big RC Power Wheels Jeep that drove kids and adults alike around the floor.
My wife and kids were there and got to see and interact with a lot more things.
Sunday, October 13, 2013
Halloween Hackathon 2013
by Aaron

Halloween Hackathon 2013 at HackRVA. We made LED Throwie Ghost Boxes and Haunted Houses, 3D printed decorations, paper masks, and played some classic scary movies. We were also visited by the PUMKINATOR; a sawz-all welding jack-o'-lantern cutting madman.
⇓ More pics and a video of the PUMKINATOR after the break.
Thursday, October 10, 2013
Hacking it Old School - DIY Lasers From a Previous Era
by Aaron
 |
| Laser V1.0. Cyberpunk before they knew what to call it. |
Check out these awesome laser and light creations from Eric! It might be hard to believe for all those arduino-naughts, but there was a time many microseconds ago when ubiquitous microelectronics, readily available IC's, and off-the-shelf lasers didn't exist and a guy just had to roll up his sleeves and do it himself - like for real. This just goes to show the wide range and deep experience the HackRVA membership has. Doesn't get much more hackerly than this.
⇓ More pics after the break.
Saturday, September 28, 2013
An Afternoon With Blender
by Aaron

An introduction to Blender was given at HackRVA during our Saturday Hack-a-thon. We've been trying out the idea of moderated video-driven classes at HackRVA and this was one of them.
Instead of the overhead and planning involved with a full-on class, we hangout and watch the best tutorials available from the web and learn together. Dustin was our moderator and resident expert for this class. Many people learned and were able to ask questions as we went.
The slight drawback to this method is that videos tend to cover things quickly. If you're sitting at home, you can hit pause. On the other hand you miss out on the fun of doing it with friends and you don't have the ability to ask an experienced user the specific thing that you might want to know not covered by the video.
In short, it was a success and the moderated video class is a viable option for learning.
Here's a link to the tutorial video we covered. It's an excellent primer.
ATX to Lab Power Supply
by Aaron


Power projects of the future with trash from the past. Michael built this utilitarian lab power supply using an ATX power supply from an old computer during one of our weekly Saturday hackathons. A little rewiring, add a few three-way binding posts and resistors... and voila. Here's a link to a very detailed build log to make your own.
Light Up Your Extra Lives - An 8-Bit Inspired Sign
by Aaron


We created this sign by projecting an 8-Bit Font onto a 1/8" Baltic birch plywood sheet then tracing it with a pencil. We then cutout the letters with a jigsaw, built a 2x4 frame, and applied paper as a light deffuser. Finally, we lit it with an LED light-strip along the inside frame driven by a 12V DC power supply.
Subscribe to:
Posts (Atom)